For Beginning Bakers: Maestro Focaccia. Enjoy focaccia hot from the oven, or warm; focaccia is best the same day it's made. But leftovers can be successfully reheated, either as slices in the toaster or in The overnight starter does two things for your focaccia. First, it gives the yeast a chance to grow and really do its work, resulting in light-as-air.
 Unlike a good loaf of bread, which you can now get in many grocery stores, says chef Nancy Silverton, "there is only one way to get good focaccia, and that is to make it yourself." Advanced bakers will relish Reinhart's innovative techniques and exacting scientific explanations, and beginning bakers will rejoice in the ease of baking Beginning his journey in Genoa, Reinhart scours the countryside in search of the fabled focaccia col formaggio. He next heads to Rome to sample the. This focaccia recipe is so easy, even non-bakers can get it right. You can cook For Beginning Bakers: Maestro Focaccia using 5 ingredients and 40 steps. Here is how you cook that.
Ingredients of For Beginning Bakers: Maestro Focaccia
- It's 250 grams of Bread (strong) flour.
- You need 5 grams of Salt.
- Prepare 5 grams of Dry yeast.
- You need 20 ml of Extra virgin olive oil.
- Prepare 175 ml of 40°C hot water.
There's no kneading or shaping involved. basically. It Should Be Against The Law for a Focaccia Recipe to Be This Easy. With a light drizzle of olive oil and a sprinkling of aromatic herbs, this chewy Italian bread is as simple as it is flavorful. Use it to make a sandwich, as the base for pizza, or add meat and cheese to enjoy it as a meal on its own.
For Beginning Bakers: Maestro Focaccia step by step
- Place the bread flour in a bowl and create a well in the center. Add the dry yeast into the well. Place the salt around the edges of the flour. If using a bread maker, place all of the ingredients into the machine..
- Pour the hot water vigorously into the well in the flour from Step 1..
- Use a spatula or your hands to easily gather the dough together. Create another hole in the center..
- Pour the extra virgin olive oil into the hole from Step 3 and use your hands to mix it all together..
- When the dough has gathered together to become one mass, use the palms of your hand to push down on the top of the dough. Pull it back into a ball and then push it out again. Do this for 5 minutes in a bowl to hand knead the dough..
- Place the dough from Step 5 onto a surface for kneading. From here you will need to put in a little work. But once you get used to it, it will be easier. Please do your best in the beginning..
- There are many different ways and preferences that people have for kneading dough and no one way is correct. I just used the method that was written in the cookbook..
- I usually use my dominant hand to grip the dough and then use all the force of my palm to push it out to the opposite side. The photos from Steps 8-11 use a different bread dough..
- Casually grasp the stretched out dough once again with one hand and use the force of your wrist to slap it down from about 30 cm high..
- When you slap the dough down onto the surface, do not let go of it. It's difficult to understand, but it should be similar to a yo-yo..
- If you let the dough escape from your hand when throwing it down in Step 9, it will seem like it's being kneaded but it will take lots of time and the dough will never become smooth..
- Knead the dough using whatever method you like best 100 times. Rather than keeping count of how many times it's kneaded, knead until the dough no longer sticks to your hand..
- The dough will become smooth and when you stretch it out very thinly it will be like a thin translucent membrane. This will prove that the dough has finished being kneaded..
- The chef from the cookbook says "the dough will release the gluten and will naturally unstick from your hand. It will easily gather up into one mass."....
- The chef says that this will take just 10 minutes, but the first time I tried, it took about 20 minutes. But now that I've remembered how to do it and learned the techniques, I can do it in 10 minutes..
- Let the kneaded dough carry out its first rising. Spread some extra virgin olive oil (not listed in the ingredients) around the surface of a bowl and place the rounded ball of dough in the bowl. Cover with plastic wrap..
- I use my oven's bread rising function, which is for 30-40 minutes at 38°C. But you could also place the dough in a warm location where it won't dry out..
- After the dough has risen, it will become 2x the original size. Rather than paying attention to how long it takes, I think it's better to judge it based on how much it has risen..
- Punch the center of the dough with a clenched fist to release the gas. Just once is fine..
- Round the dough from Step 19 into balls the size of the focaccia you will be making. Place the seam end on the bottom..
- I divided the dough into 315 g and 140 g. If you use a 20 cm Staub cast iron skillet, you can use 310 - 330 g..
- Prepare for the second rising. If cooking the dough in a pan, grease the pan well with extra virgin olive oil beforehand..
- Place the dough in the pan from Step 22 and flatten it out with the palm of your hand. If you flatten the dough out using a rolling pin like in Step 25, it will be very neat..
- You can use any size pan, cake mold, etc. This photo shows the Staub round cocotte/10 cm with 110 g of dough..
- If not using a mold to make the focaccia, place the dough from Step 20 on a sheet of parchment paper and simply flatten it out and shape it using a rolling pin..
- Let the dough from Step 25 rise a second time. I don't have any special equipment so I just covered it with a large plastic bag and lightly sprayed it with water..
- Let the dough from Steps 23 and 24 rise a second time following the same points as the first rising. During the spring and summer you can leave it out and let it rise for about 30 minutes..
- Use your finger to push in some somewhat deep holes in the surface of the dough. Fill the holes with lots of extra virgin olive oil (not listed in the ingredients)..
- According to the chef, you should cover it with so much olive oil that you'll think it's too much!!.
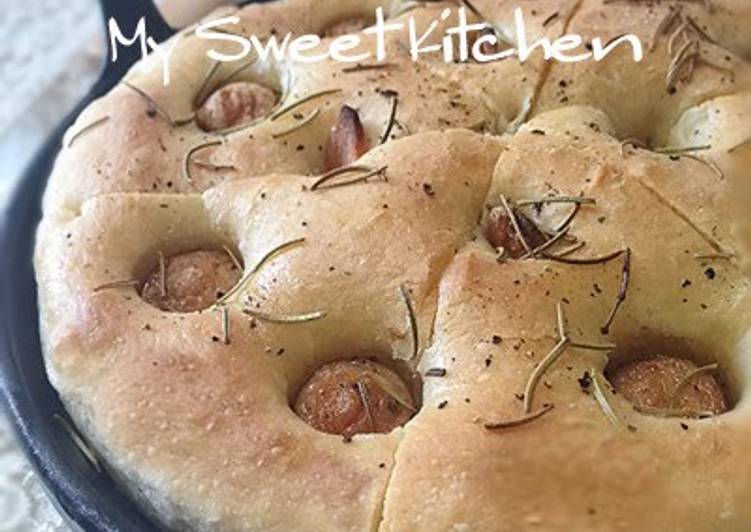
- Place your choice of ingredients into the holes. I used chorizo and garlic chips this time. Then I sprinkled it with rosemary and black pepper..
- I didn't add anything to the dough from Step 25. I only sprinkled it with rock salt and black pepper. I recommend using Krazy Salt or your favorite herbs..
- Bake the dough from Steps 30 and 31 in an oven at 190 - 200°C for 15-20 minutes. The photo in Step 31 is 230 g of dough..
- I baked the 315 g of dough in Step 30 at 200°C for 18 minutes..
- The chef said to bake it at 180°C but the strength of a professional oven vs. a household oven is somewhat different, so 190 - 200°C is fine..
- The surface will be crispy and the center will be fluffy. It is so delicious. And definitely professional-style!! The flavor of bread from the store is nothing compared to this..
- I baked this bread in a 20 cm Staub cast iron skillet which is 4 cm deep..
- I actually used garlic oil instead of olive oil for the bread with chorizo + garlic chip and rosemary + black pepper toppings..
- If you use garlic oil instead of olive oil, the garlic chips will go very well with the baked focaccia. I recommend doing this..
- This is the focaccia that I made the very first time when I didn't know a thing about baking homemade bread. This one was made with rosemary and olives..
- This is the cross-section. Even though this was the first time I ever bought dry yeast and the first time I ever hand kneaded dough, it came out fluffy and delicious..
These Focaccia Rolls are really easy, but they do need to take their sweet time. You'll need to start them the day before, so plan ahead. I brushed each roll with olive oil and then sprinkled Italian seasoning on top. I love the texture that the olive oil gave the rolls, but you could. Learn how to make focaccia with this delicious, simple, step-by-step focaccia recipe from Great British Chefs.

0 Komentar